Spring Boot 2 を使い、HTML上にあるセレクトボックスのメニューを、データベースに格納されたレコードからセットするページを作成します。
View部分にはThymeleafを使用しています。
mysqlのテーブルに格納されたレコードを取得し

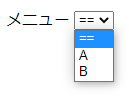
HTML画面上のセレクトメニューにセットし、表示します。
Entity Classの作成
まずEntity Classを作成します。今回は、IDと名前の2カラム(フィールド)だけの構成とします。
import javax.persistence.Column;
import javax.persistence.Entity;
import javax.persistence.GeneratedValue;
import javax.persistence.GenerationType;
import javax.persistence.Id;
import javax.persistence.Table;

@Entity
@Table
public class MenuData {

	@Id
	@GeneratedValue(strategy=GenerationType.IDENTITY)
	@Column
	private long id;

	@Column(length=50, nullable = false)
	private String name;

	public long getId() {
		return id;

	}

	public void setId(long id) {
		this.id = id;

	}

	public String getName() {
		return name;

	}

	public void setName(String name) {
		this.name = name;

	}

}
Repository Interfaceの作成
データベースアクセスを行う為のRepository Interfaceです。JpaRepositoryを継承して、先に作成したEntity Classをセットするだけ。
import org.springframework.data.jpa.repository.JpaRepository;
import org.springframework.stereotype.Repository;

@Repository
public interface MenuDataRepository extends JpaRepository<MenuData, Long> {

}
Controller Classの作成
次にController Classです。先に作成したrepositoryでテーブルを全件検索し、”menulist”オブジェクトに格納して、”index”へ渡しています。
import java.util.List;

import org.springframework.beans.factory.annotation.Autowired;
import org.springframework.stereotype.Controller;
import org.springframework.transaction.annotation.Transactional;
import org.springframework.web.bind.annotation.ModelAttribute;
import org.springframework.web.bind.annotation.RequestMapping;
import org.springframework.web.bind.annotation.RequestMethod;
import org.springframework.web.servlet.ModelAndView;

@Controller
public class MenuSampleController {

	@Autowired
	MenuDataRepository repository;

	@RequestMapping(value="/", method=RequestMethod.GET)
	@Transactional(readOnly=false)
	public ModelAndView index(@ModelAttribute("formModel") MenuData sedata, ModelAndView mav) {
		mav.setViewName("index");
		List<MenuData> list = (List<MenuData>)repository.findAll();
		mav.addObject("menulist", list);
		return mav;

	}

}
Viewの作成
先に作成した Controller Class にてパラメータの渡し先となっていた “index” です。ファイル名は index.html です。
“menulist”を展開して、メニューへセットしています。
<!DOCTYPE HTML>
<html xmlns:th="http://www.thymeleaf.org">
	<head>
		<title>top page</title>
		<meta http-equiv="Content-Type" content="text/html; charset=UTF-8" />
	</head>
	<body>
		<table>
				<tr>
					<td><label for="categoryId">カテゴリ</label></td>
					<td>
						<select name="categoryId" th:value="*{id}">
							<option value="">==</option>
							<option th:each="item : ${menulist}" th:value="${item.id}" th:text="${item.name}" th:selected="${item.id} == *{id}"></option>
						</select>
					</td>
				</tr>
		</table>
	</body>
</html>
データベースへの接続情報を application.properties へ記述し、起動します。
テーブルが存在しなければ、初回アクセス時に作成されます。
レコードを格納しておけば、セレクトメニューに値が表示されるハズ。